
I love to layer sentiments on a card front in a way that deepens the greeting I want to extend. I also love words and alphabets too! I thought it would be fun to combine layered sentiments and alphabets together with three easy techniques for creating fun card fronts.
Three Techniques for Word Play
- Eclipse Technique
- Positive & Negative (2-in-1 cards)
- Inlaid Die Technique
Here’s Your Homework 😉
- Watch the video tutorial for Word Play Techniques (link below).
- Download the Word Play techniques pdf to use as a reference.
- Shop your stash for greetings, alphabet dies, and word dies to try out three easy techniques.
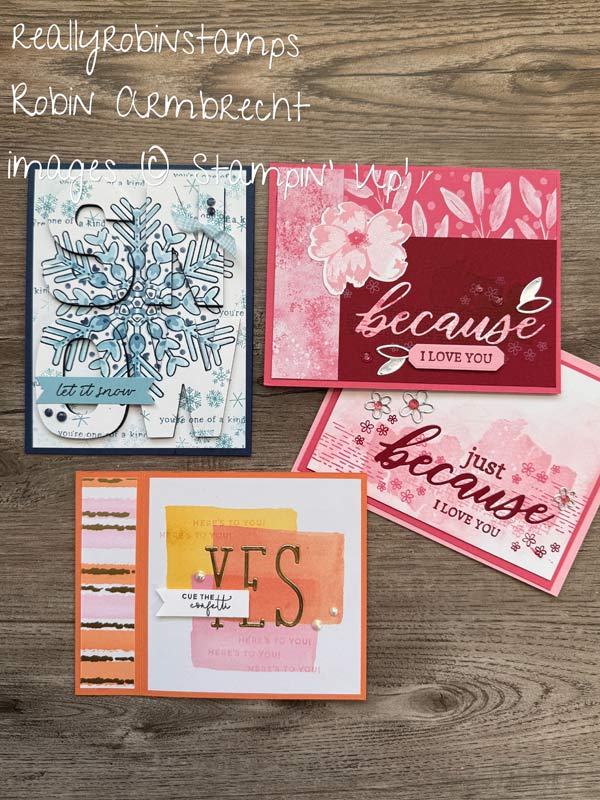
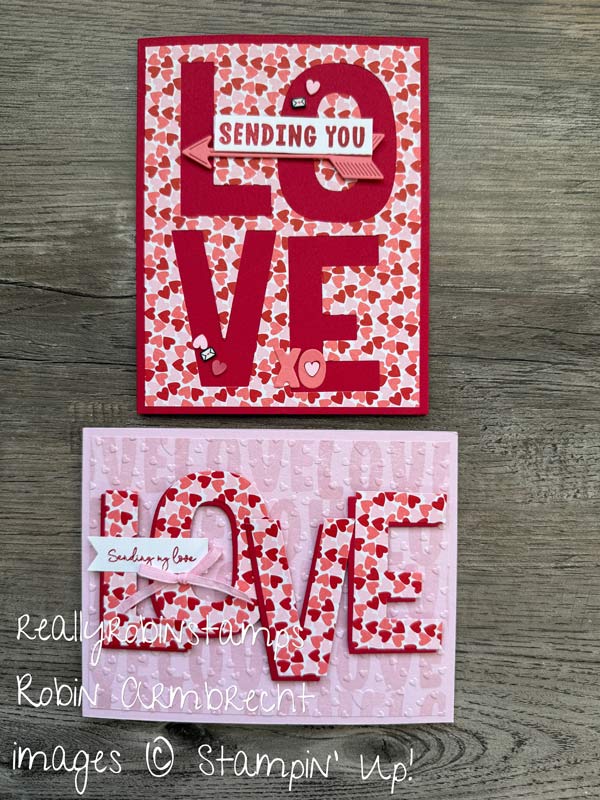
Eclipse Technique
- Stamp a background design on a plain cardstock piece ( a trimmed quarter 4” x 5-1/2” works great).
- Arrange the alphabet letters to spell a word over the background design and cut out.
- Attach the trimmed quarter to a card base that is a dark cardstock, or just attach a dark cardstock in-between the quarter and the card base. You want to have a dark color in the negative space created by the cut-out dies.
- Attach Foam Adhesive Strips or Stampin’ Dimensionals to the backside of the letters, and mount back inside the negative space.
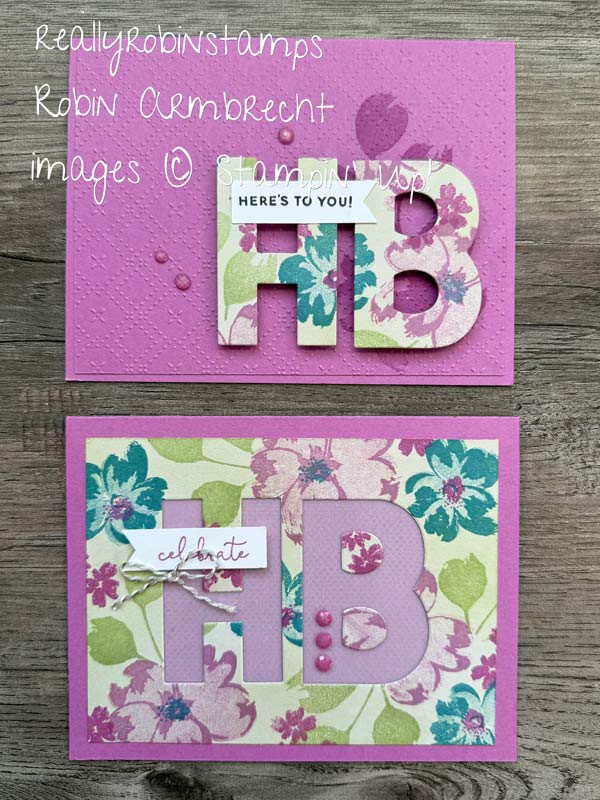
Inlaid Die Technique
- Using a word die or alphabet dies, cut out a shape or design from the trimmed piece of cardstock that will go on the from of the card base.
- Take out the cut shape leaving the negative “hole” and adhere the card front to the card base.
- Cut out the same die shape or design again in a different cardstock or patterned paper using scraps that fit the size of the shape/design die.
- Inlay these shapes or designs into the negative “holes” on the card front.
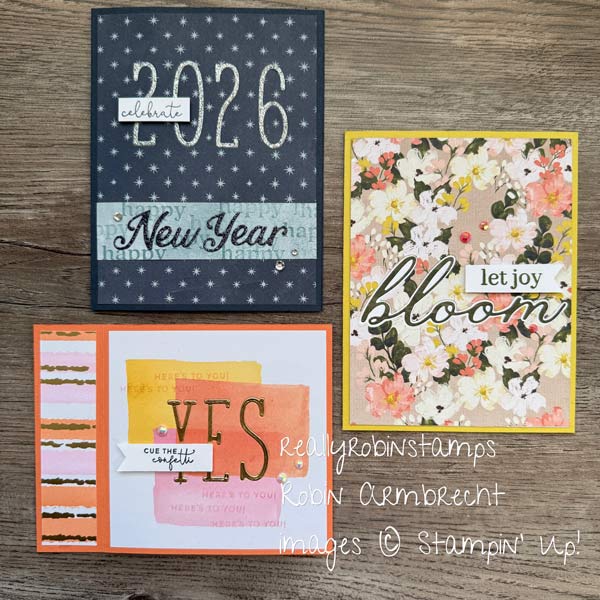
Positive & Negative (2-in-1)
- This technique is begins in the same way as technique #2 following steps 1 & 2.
- Use the negative piece on one card base, and the cut out word/letters on another card base.
- The negative piece can be attached directly to the card base or popped up. Be sure to save and use all the letter/word holes to glue back down (you can reinsert the word/letters to use a guide).
- The cut out word/letters can be arranged and popped up on a new card. This is a great opportunity to layer the word/letters with a coordinating cardstock color.
Ready to try creating layered sentiments and/or using alphabets & words on your card fronts? I hope you take these three easy techniques and run with them – I think you will love them! 😁

Product List
![Swirled Designs Bundle (English) [ 167311 ]](https://assets1.tamsnetwork.com/images/EC042017NF/167311s.jpg "Swirled Designs Bundle (English) [ 167311 ]")
|
![Three Banner Punch [ 167050 ]](https://assets1.tamsnetwork.com/images/EC042017NF/167050s.jpg "Three Banner Punch [ 167050 ]")
|
![Banner Sayings Bundle (English) [ 167051 ]](https://assets1.tamsnetwork.com/images/EC042017NF/167051s.jpg "Banner Sayings Bundle (English) [ 167051 ]")
|
![Words Of Beauty Bundle (English) [ 167090 ]](https://assets1.tamsnetwork.com/images/EC042017NF/167090s.jpg "Words Of Beauty Bundle (English) [ 167090 ]")
|
![Petals Of Beauty Bundle (English) [ 167096 ]](https://assets1.tamsnetwork.com/images/EC042017NF/167096s.jpg "Petals Of Beauty Bundle (English) [ 167096 ]")
|
![Blending Brushes [ 153611 ]](https://assets1.tamsnetwork.com/images/EC042017NF/153611s.jpg "Blending Brushes [ 153611 ]")
|
![Alphabet à La Mode Dies [ 160750 ]](https://assets1.tamsnetwork.com/images/EC042017NF/160750s.jpg "Alphabet à La Mode Dies [ 160750 ]")
|
![Party Alphabet Dies [ 165263 ]](https://assets1.tamsnetwork.com/images/EC042017NF/165263s.jpg "Party Alphabet Dies [ 165263 ]")
|
![Mini Alphabet Dies [ 162934 ]](https://assets1.tamsnetwork.com/images/EC042017NF/162934s.jpg "Mini Alphabet Dies [ 162934 ]")
|
![Foam Adhesive Strips [ 141825 ]](https://assets1.tamsnetwork.com/images/EC042017NF/141825s.jpg "Foam Adhesive Strips [ 141825 ]")
|
![Snowy Delights Bundle (English) [ 165809 ]](https://assets1.tamsnetwork.com/images/EC042017NF/165809s.jpg "Snowy Delights Bundle (English) [ 165809 ]")
|
![Snowy Delights Decorative Masks [ 165808 ]](https://assets1.tamsnetwork.com/images/EC042017NF/165808s.jpg "Snowy Delights Decorative Masks [ 165808 ]")
|
![Sweet Blooms Bundle (English) [ 165189 ]](https://assets1.tamsnetwork.com/images/EC042017NF/165189s.jpg "Sweet Blooms Bundle (English) [ 165189 ]")
|
![2025–2027 In Color™ 6" X 6" (15.2 X 15.2 Cm) Designer Series Paper [ 165300 ]](https://assets1.tamsnetwork.com/images/EC042017NF/165300s.jpg "2025–2027 In Color™ 6\" X 6\" (15.2 X 15.2 Cm) Designer Series Paper [ 165300 ]")
![Silver 12" X 12" (30.5 X 30.5 Cm) Foil Sheets [ 163387 ]](https://assets1.tamsnetwork.com/images/EC042017NF/163387s.jpg "Silver 12\" X 12\" (30.5 X 30.5 Cm) Foil Sheets [ 163387 ]")


you have inspired me to try the eclipse technique, Thanks,
Hi Peggie! Thank you for your comment and I hope you do try the eclipse technique!
wonderful technique, Thanks, I will try it after the holidays