
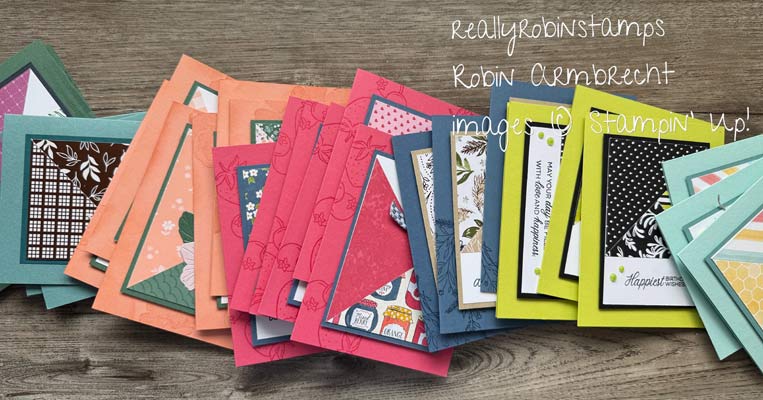
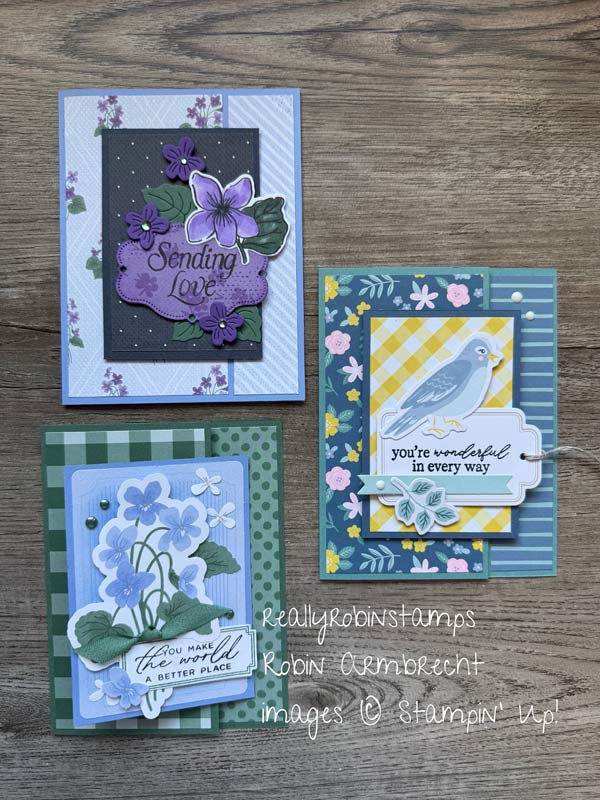
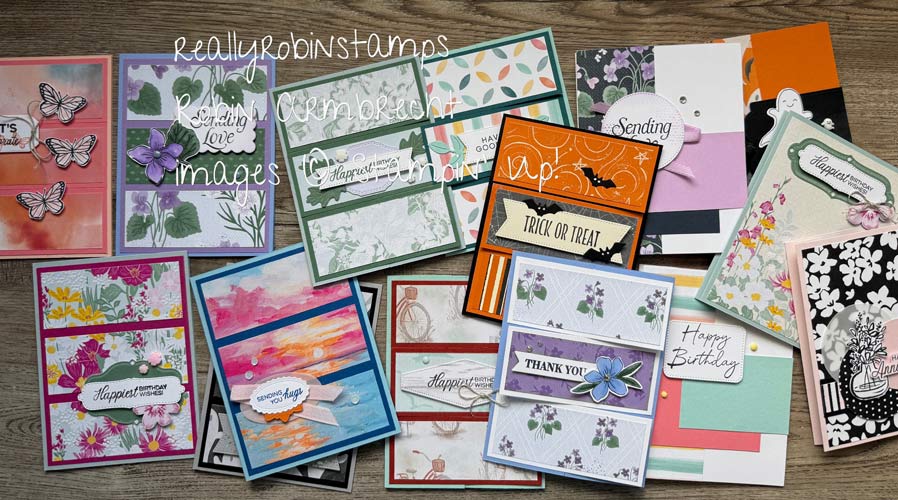
It’s time for another card template! I’m so excited to share this template with you because it is not only easy to put together, but has so many variations to try! Whether using DSP or cardstock that has been embossed with a folder, you can create some amazing card fronts! I received major inspiration for this idea from fellow demonstrator, Vy Tran of Crafting Daily Dose, who shared this idea on her website. Take a peek at my video tutorial for step-by-step directions and download the pdf for your creative files.


Supplies
- 5 1/2” x 8 1/2” card base
- 4” x 5-1/4 ” cardstock neutral
- 2-1/2” x 1-1/4” DSP (4 different designs)
- 2-1/2” x 1-1/4” Basic White
- 1-1/4” x 1-1/4” DSP (2 different designs)
- Embossing folder (optional)
- Ribbon or embellishments
Directions
- On the 4” x 5-1/4 ” piece of cardstock start adhering the blocks starting with the 2 squares in opposite corners. There will be an 1/8” margin around the edges and in between the blocks
- Continue adhering the rectangular blocks lining up around the outside edge, leaving the Basic White rectangle for last.
- Stamp greeting sentiment on the Basic White rectangle and attach to card front.
- Optional: Run the card front through an embossing folder to “quilt it.”
- Adhere the card front to the card base.
- Embellish as desired.


I hope you give this card template a try and enjoy its simplicity and beauty! Come post your sample/creations in our Facebook Group: Robin’s Really Super Stampers.

Product List

|

|
 Designer Series Paper")
|
 Designer Series Paper")
|
 Designer Series Paper")
|
 Designer Series Paper")
|
")
|

|
I absolutely love this layout and ALL of your samples. Thank you for sharing.
Thank you, Kathy! I appreciate your sweet comment!
I love this layout as well. Will you be doing any more One Sheet Wonders
Hi Melanie! Thank you! I’m glad you like the layout. I try to invent OSW as they come to me – it’s always on my mind!
This is an ingenious way to use up those pesky scraps! Thanks for sharing!
So glad you like this template too – it’s a keeper! Happy creating, Sherry!
Thank you for sharing this great layout!
I’m so happy you like this design, Dawn!
Wow I can’t wait to get started — I love all the samples.
Hi Barbara! I hope you make a bunch of this template and use up lots of paper scraps!
Robin I love this layout, especially the 1 1/4 to 2 1/2 ratio. It makes it so easy to count and cut. Thank you
Hi Kathleen! I’m glad you are enjoying this layout as much as I do. Once you start, it’s hard to stop!
What year was the Flitting Florets DSP ? I love your cards
I’m just not sure – it was at least 2 years ago?
I missed this playdate so finding it just now on your blog is exciting. I’m going to play with this design this afternoon.
I hope you had a blast with this template today!
Thank You for inspiring me in so many ways….love all your layouts and also suppling us with templates and
with instructions…very useful. Again a BIG Thank You!
Hi Veronika! Thank you for your sweet words – I appreciate you taking the time to write me. I’m always thrilled to know that people are creating! Thanks!
So so so wonderful! I might be a little late to the party, but this template is super. Thank you for sharing!
You are never late for this template – one of my all time favs.
Dear Robin, Could you please tell me the name of the embossing folder that you used to make the light green card with the black gingham ribbon? It says so very merry on the front. It’s a beautiful card! Thank you so much!
Hi Fran! The embossing folder I used is called Whimsical Woodlands. It is a retired product, however, and you would have to search for retired Stampin’ Up! products online to see if someone is selling it currently from their stash. Thank you very much for your message!
What year was the Flitting Florets dsp? Beautiful cards.
I just love all the examples you’ve made with this Scrambled Blocks Template #13!! I just recently found it, and now I see that you have a bunch of these kinds of templates! Thank you for your generosity in sharing these for our inspiration. Bless you!
Thank you so much, Luralyn! Enjoy all the ideas and be creative!